| A1 Electric Automotive Accessories |
| Installing Power Windows in a New Beetle, Part 2 |
| HOME | ELECTRIC LIFE POWER WINDOWS | INSTALLATION ARTICLES | KEYLESS ENTRY & ALARM SYSTEMS |
| OE Replacement Motors | Switch Kits | Power Door Locks | Spal Accessories | Pop Doors | Colibri | Classic Car Windows |
| ONLINE CATALOG & APPLICATION GUIDE |
|
|
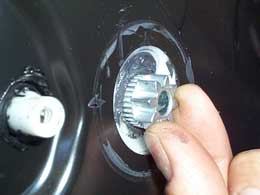
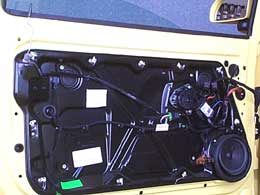
The new drive gear is carefully inserted into the regulator. With the drive mechanism removed from the door, the window regulator in the door is loose. Care must be taken not to push the regulator into the door |
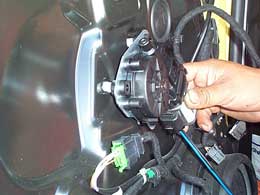
| Our installer connects the motor wires and places the new drive assembly over the drive gear. Our installer pays careful attention making sure the gear is properly seated in the motor and the regulator. |
|
|
|
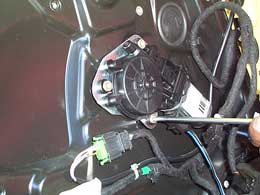
The 3 mounting screws previously removed are used to attach the new drive onto the regulator. |
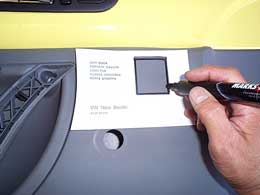
| Using the supplied templates, the holes for the switches are carefully marked. |
|
|
|
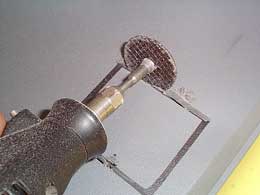
We used a Dremel Tool to cut out our holes. Drills and a saw blade or a utility knife could also be used to cut out the holes. |
| We used a file to enlarge and clean up the holes after cutting them. It is always better to start off with a hole on the small side and file it out rather than making the holes too large from the beginning. Reducing an oversize hole is not an easy task! |
|
|
|
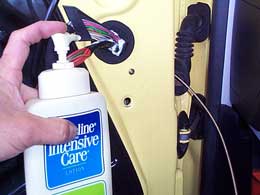
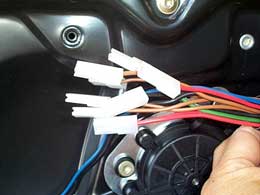
To make it easier to run the wiring, our installer cut the wire loom in half, approximately 2 feet from the left end. The wires were then run from the doors through the door jamb boots and into kick panels. The boots in the door jambs are pressed in and pull out easily to aid in running the wiring. We used an old speedometer cable for a fish tape and some lanolin based lotion as a lubricant. |
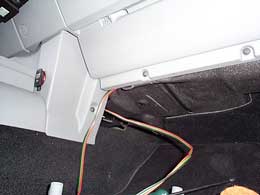
| The wiring is run across the under side of the dash from the right door. Our installer carefully tie strapped it out sight and out of harms way. Care must always be taken to avoid moving parts such as the AC controls, the gas pedal and brake pedal. |
|
|
|
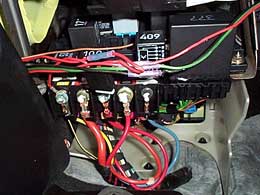
The 2 ends of the wire loom are cut to length and the 3 cut wires are connected together using butt connectors. The red wire is reconnected to the supplied fuse holder and attached to the ignition power tap using a ring terminal. The ignition power tap is the stud all the way to the left with the black/yellow wire attached to it. |
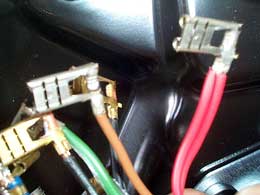
| Unfortunately, we found out that the connectors that come on the wiring are too large. With these connectors the switches and wiring would not fit into the door panel without hitting the door underneath it. We remedied this small problem by cutting off the original ends... |
|
|
|
and crimping on right angle connectors. This gained us over a quarter inch in mounting depth. More than enough to clear the doors. Just goes to show you that even engineers make mistakes. |
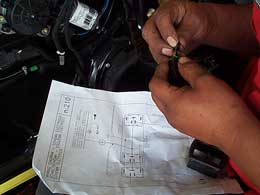
| The wiring is then connected to the switches using the supplied wiring diagrams. |
|
|
|
With the switches connected and the drives in place, we test the system for any problems. The drives work perfectly, and both windows work great. |
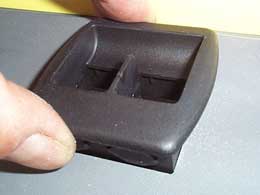
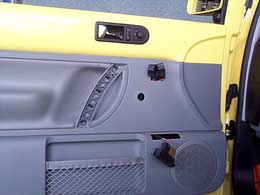
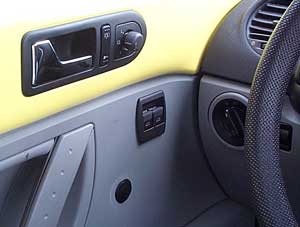
| The door panels are then reinstalled onto the doors and all of the linkages and wires that were previously disconnected are now reconnected. The switches are clipped into their bezels and the hole plugs are snapped into the door panels. |
|
|
|
The finished system looks and works great! |
| This concludes the Volkswagen Beetle installaton.
Return to: Installation Articles |
Ready to Order?
Need Prices?
Use our Online Catalog & Application Guide!
![]()
We have thousands of items in stock and ready
to ship!
A1 Electric Automotive Accessories
Local (310) 328-8500 Toll Free (888) 838-0506
Contact A1 Electric by Email
Ready to checkout?

SHOPPING CART
Home |
Company Information |
Ordering Information |
FAQ's
Electric Life Power Windows |
Installation Articles |
MES Power Door Locks
Alarms & Keyless Entry |
Power Window Switches |
OE Window Lift Motors |
Colibri Power Windows
Accessories & Pop Door Kits |
Street Rod Window Kits |
SPAL |
Classic Car Windows |
Speedometer |
Links to other Sites
Tech Articles & Information
Mustang |
Chevelle |
Dodge Ram PU |
Door Lock Installs |
S10 Window Motor |
Maxima |
Grand Am |
Silverado Windows
Cable Locks |
Tacoma |
Tacoma Tech |
Ford F150 |
55 Chevy |
Volvo |
Chevy PU |
Camaro |
VW Golf |
Chevy PU
Chevy Astro |
Caravan |
VW Beetle |
Colibri-Astro |
Mopar |
Focus |
Silverado Door Locks