


| A1 Electric Automotive Accessories |
| Chevy Astro Power Window Installation |
| HOME | ELECTRIC LIFE POWER WINDOWS | INSTALLATION ARTICLES | KEYLESS ENTRY & ALARM SYSTEMS |
| OE Replacement Motors | Switch Kits | Power Door Locks | Spal Accessories | Pop Doors | Colibri | Classic Car Windows |
| ONLINE CATALOG & APPLICATION GUIDE |
| The Chevrolet Astro has been one of the most popular and versatile minivans since 1985. Although there are numerous accessories available for these vans, adding power windows is one modification that can be enjoyed by all. |
|---|
|
|
This Astro is not your avarage grocery getter! This Tandem Astro is one mean van. Our crew will be installing Electric Life regulators and a custom wiring kit available exclusively from A-1 Electric. |
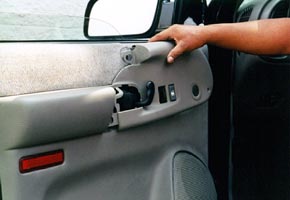
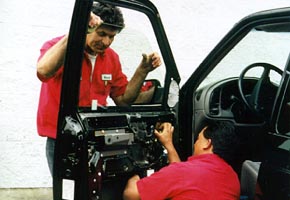
| The first step in this project is to remove the door trim and crank handle. The pull handle and plate are secured with Torx screws. The crank handle has a "c" shaped wire clip which must be removed with a handle removal tool or with a small screwdriver or hook. |
|
|
|
Our installer carefully prys up the plastic clips that hold the door panel on. The tool we use is a scraper with a bent blade and a notch cut into the end. After the panel is removed, the plastic liner is carefully removed and saved for latter. |
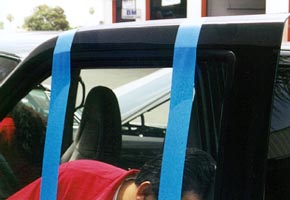
| This step is critical! The glass must be secured with tape, suction cups or a patient helper to prevent it from falling while working in the door. |
|
|
|
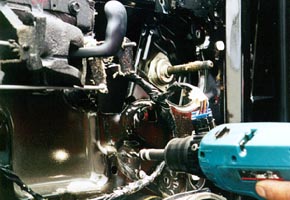
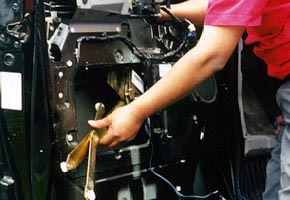
The four aluminum rivets that secure the factory regulator must be removed with a 1/4 inch drill bit. Use a punch and hammer to knock the steel center pins out of the rivets before drilling. |
| Our technician carefully slides the rollers on the factory regulator out of their channels on the glass and the door. The regulator is then removed from the door. |
|
|
|
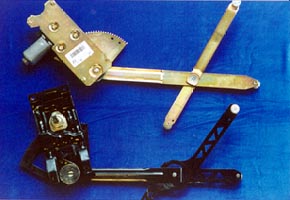
This is the reason we like Electric Life kits so much. Notice how the kits regulator resembles the factory regulator in its mounting and construction. Before installing the new regulator our tech plugs the wires into the motor. |
| The Electric-Life regulator is placed into the door and the rollers are carefully placed into the channels. 2 rollers go on the glass channel and 1 goes in the idler channel. Getting all three rollers into both channels simultaniously can be tricky. |
|
|
|
With the rollers in place the window is carefully moved up and down until the regulator mounting plate lines up with the holes in the door. An alternate way would be to apply power and ground to the motor wires (reverse the power and ground to reverse direction of travel). |
| This concludes part 1 of the installaton.
See part 2 for the remainder of the install. PART 2 |
Ready to Order?
Need Prices?
Use our Online Catalog & Application Guide!
![]()
We have thousands of items in stock and ready
to ship!
A1 Electric Automotive Accessories
Local (310) 328-8500 Toll Free (888) 838-0506
Contact A1 Electric by Email
Ready to checkout?

SHOPPING CART
Home |
Company Information |
Ordering Information |
FAQ's
Electric Life Power Windows |
Installation Articles |
MES Power Door Locks
Alarms & Keyless Entry |
Power Window Switches |
OE Window Lift Motors |
Colibri Power Windows
Accessories & Pop Door Kits |
Street Rod Window Kits |
SPAL |
Classic Car Windows |
Speedometer |
Links to other Sites
Tech Articles & Information
Mustang |
Chevelle |
Dodge Ram PU |
Door Lock Installs |
S10 Window Motor |
Maxima |
Grand Am |
Silverado Windows
Cable Locks |
Tacoma |
Tacoma Tech |
Ford F150 |
55 Chevy |
Volvo |
Chevy PU |
Camaro |
VW Golf |
Chevy PU
Chevy Astro |
Caravan |
VW Beetle |
Colibri-Astro |
Mopar |
Focus |
Silverado Door Locks