A1 Electric Automotive Accessories
  Installing a Street Rod Power Window Kit in a 1959 Volvo
HOME   |   ELECTRIC LIFE POWER WINDOWS   |   INSTALLATION ARTICLES   |    KEYLESS ENTRY & ALARM SYSTEMS
OE Replacement Motors | Switch Kits | Power Door Locks | Spal Accessories | Pop Doors | Colibri | Classic Car Windows
ONLINE CATALOG & APPLICATION GUIDE

 
Installing an Electric Life EL12-K Street Rod 
Power Window Kit in a 1959 Volvo.

Page 14


With the window in it's full down position, the regulator is marked and a 1/4 inch hole is drilled about 1/2 inch below the mark.  A 1/4 inch bolt and nut are screwed into the hole.  This nut and bolt will serve as the windows bottom stop, preventing it from going too far down in the door.

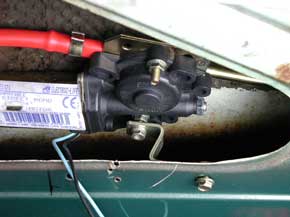
The motor bracket is bent into a Z shape, a 1/4 inch hole is drilled in the door and the bracket is bolted into place.  This is important.  You don't want the motor floating around in the door, banging into everything.   

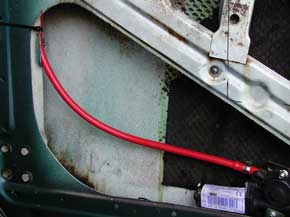
See the photo on the bottom right.  This is extremely important for Goldie cable kits.  The plastic tube (red) must be smoothly routed.  This is where the extra cable is held.  If this tube gets kinked or bent around a tight turn, your windows will stop working.


PREVIOUS           NEXT PAGE

Article Pages
1  2  3  4  5  6  7  8  9  10  11  12  13  14  15  16  17  18  19  20


Ready to Order?     Need Prices?
Use our Online Catalog & Shopping Cart!


Application Guide
We have thousands of items in stock and ready to ship!

A-1 Electric
Local (310) 328-8500    Toll Free (888) 838-0506
Contact A1 Electric by Email


Ready to checkout?

SHOPPING CART


Online Catalog & Shopping Cart
Home | Company Information | Ordering Information | FAQ's
Electric Life Power Windows | Installation Articles | MES Power Door Locks
Alarms & Keyless Entry | Power Window Switches | OE Window Lift Motors | Colibri Power Windows
Accessories & Pop Door Kits | Street Rod Window Kits | SPAL | Classic Car Windows | Speedometer | Links to other Sites